













Cloudflare Enterprise normally means a direct contract with Cloudflare, negotiated at volume and priced for large organizations. xCloud already holds that contract. The addon lets you put a single domain behind it for $5 a month, with none of the negotiation and no minimum commitment.
It runs on Cloudflare for SaaS. Your domain joins xCloud’s Cloudflare account as a custom hostname, so you keep your current DNS provider, leave your nameservers where they are, and add one or two records. Everything after that happens in your xCloud dashboard: cache rules, WAF toggles, purge, analytics, security events. You will never need to log into Cloudflare.
Below is the whole process, from buying the addon to reading your first security report.
What Cloudflare Enterprise does for your site #
Once a domain is verified, its traffic stops going straight to your server and starts coming through Cloudflare’s edge network. That changes a few things:
- Static files like images, CSS, and JavaScript are served from whichever Cloudflare location is nearest your visitor.
- Dynamic pages can be cached at the edge too, which cuts the wait before the first byte arrives. xCloud turns off local page caching when you enable this so the two do not fight each other.
- Cloudflare’s managed WAF rulesets sit in front of the site and catch emerging threats, including zero-days.
- Layer 7 DDoS attacks can be met with Under Attack Mode, which makes every visitor pass an extra check before reaching the site.
- Noisy traffic gets filtered: rate limiting on IPs that exceed the threshold, browser integrity checks on malformed requests, and a switch to block known AI crawlers.
- Images are compressed at the edge, Early Hints let browsers start fetching assets sooner, and ScrapeShield scrambles email addresses so bots cannot harvest them.
- Request counts, data transfer, and security events are reported back into your dashboard.
Activation is per domain rather than per site, per server, or per plan, so you can cover the domains that need it and leave the rest alone.
Pricing #
$5 per month, per domain.
Each subscription covers exactly one hostname. Buying example.com does not cover www.example.com — that is a separate purchase. If you skip it, www keeps resolving wherever its own DNS record points and never goes through Cloudflare. If you want several domains or subdomains protected, subscribe to each one and manage them together from the Addons page.
Before you start #
- The team must be billing-enabled and eligible to purchase addons.
- The site must already exist under a server.
- The domain must be available to configure at its DNS provider, and you need access to edit its DNS records.
- Know your origin IP. It is shown on the site page in xCloud, and you will need it if you are activating a root domain.
- Know whether the domain you are adding is a root domain (example.com) or a subdomain (www.example.com, shop.example.com). The DNS steps are different, and getting the order wrong on a root domain will stall activation.
Important: the order of DNS changes for root domains #
Read this before you touch DNS.
Cloudflare will not verify a custom hostname whose DNS already resolves to Cloudflare’s own IPs. If you add the edge records first and then try to verify, you create a deadlock: the domain resolves to Cloudflare, Cloudflare refuses to verify it, the hostname never activates, and the edge returns an error for every request. The error Cloudflare reports looks like this:
The hostname is using Cloudflare and cannot be activated with an TXT or HTTP validation token. To activate the custom hostname, the DNS target needs to point to the SaaS zone
So the rule is:
Verify ownership while your root domain still points at your origin server. Move it to Cloudflare only after the status reads Active.
Subdomains are not affected by this. A subdomain gets a plain CNAME and usually activates within seconds of purchase. Root domains need the two-phase approach described in Step 3b.
Follow this documentation to connect your domain which are hosted in xCloud. But if you want to connect your external domain which is not assosiated with xCloud then visit this documentation for the step by step process.
Step 1: Activate the Cloudflare Enterprise addon #
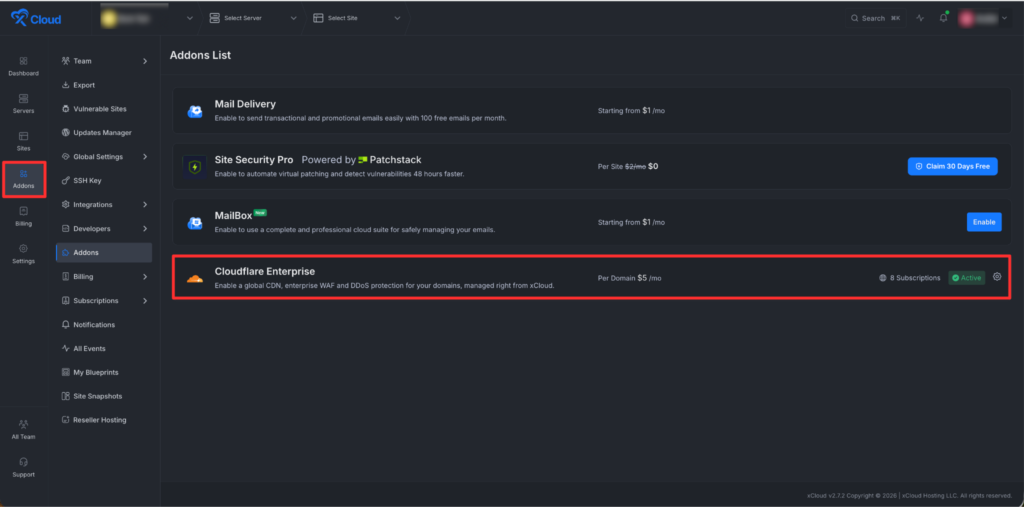
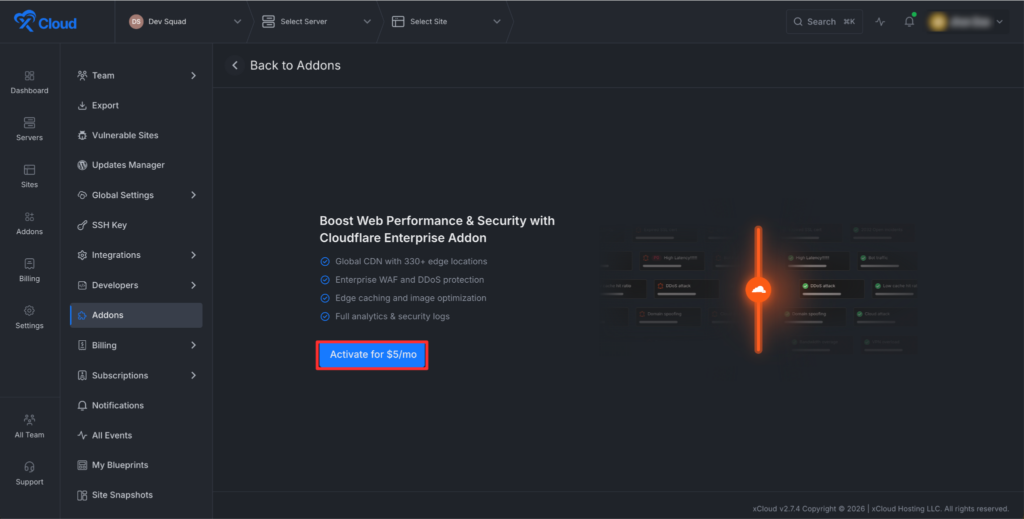
From your dashboard, click Addons, find Cloudflare Enterprise, and click Enable.
Step 2: Enable Cloudflare Enterprise on your site #
Click Enable and proceed. You can activate Cloudflare Enterprise on any domain for $5/month.
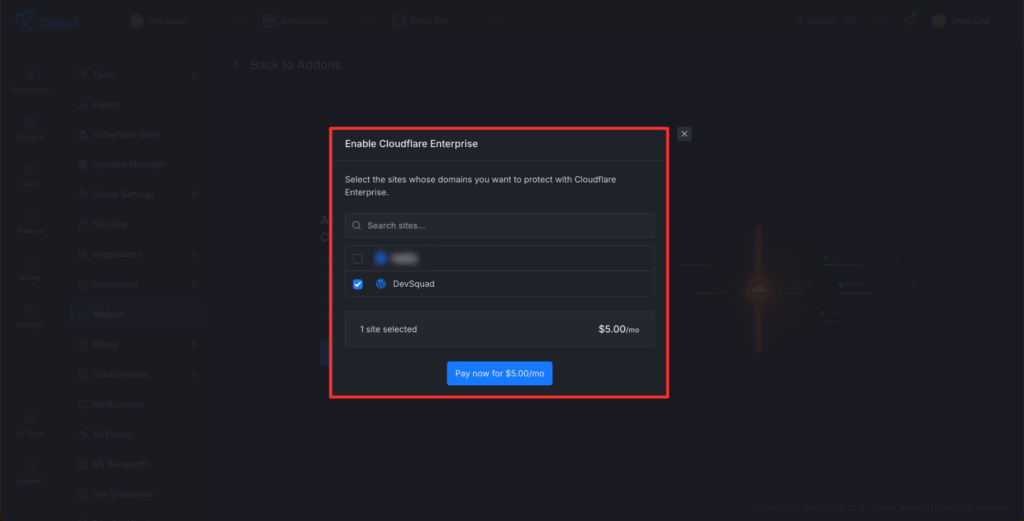
Choose the domain from the dropdown in the popup and click Pay to complete the purchase and enable Cloudflare for this domain.
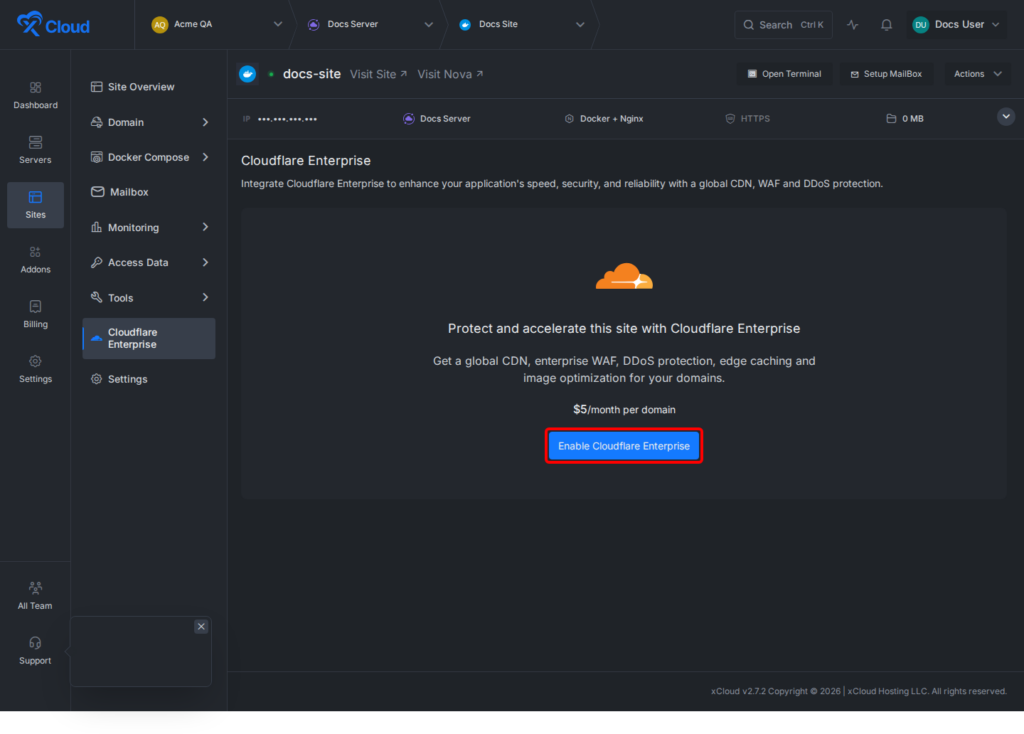
You can also open the feature from a specific site at Site → Cloudflare Enterprise. Before any domains are added, the site page shows an empty state and an Enable Cloudflare Enterprise button.
Step 3: Complete the DNS setup #
Once payment goes through, the domain appears in your dashboard. If you already have Cloudflare integrated, the domain may activate instantly. Otherwise it shows Pending Verification.
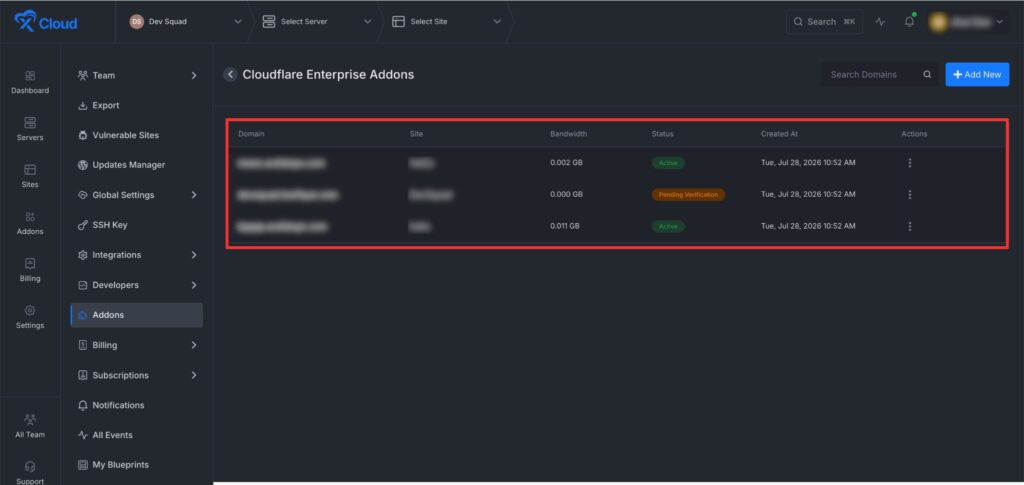
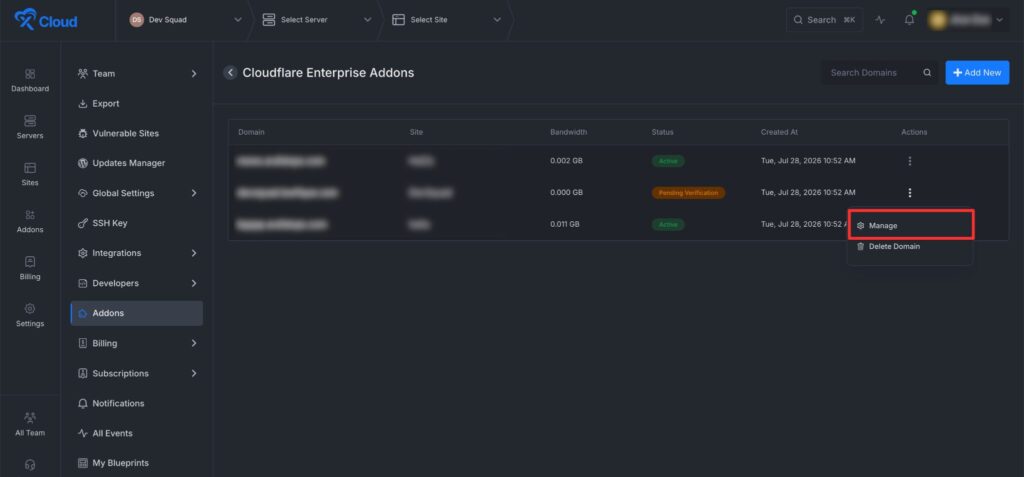
Click the three-dot icon on the domain row and choose Manage to open the DNS verification and configuration screens.
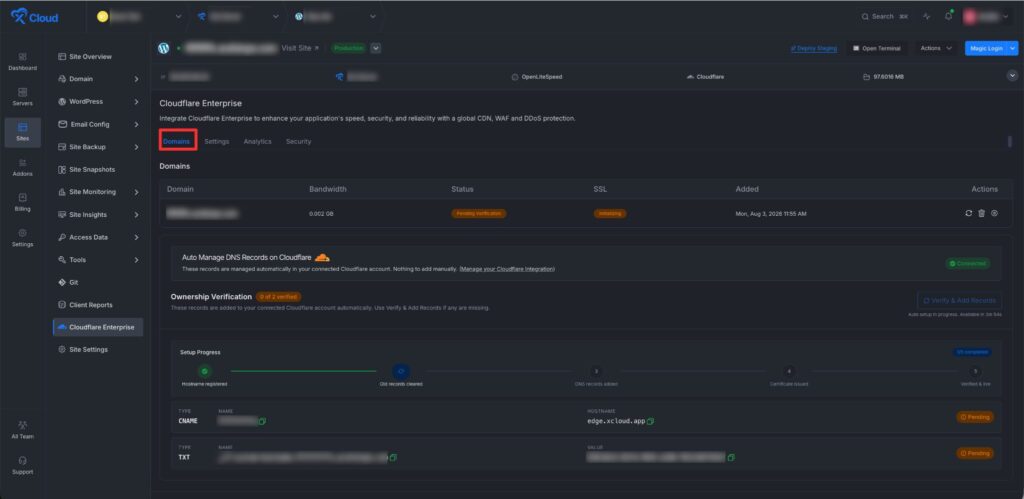
Under the Domain tab, you will get the DNS verification Records. xCloud opens a DNS instructions modal with the exact records to add at your DNS provider – a CNAME, fallback A-records for apex providers that cannot CNAME the root, and an ownership TXT record.
Use the values to verify the DNS records of your domain.
Subdomains (including www) #
Add the single CNAME record shown in the modal:
| Type | Name | Value |
| CNAME | www.example.com | edge.xcloud.app |
Go to the Domain Status tab, click Refresh, and the domain should show as Active. Activation here is usually near-instant, with SSL following shortly after.
Root (apex) domains #
Do these in order. Adding the edge records before verification is what causes the deadlock described above.
Phase 1: Add only the ownership TXT record. #
| Type | Name | TTL | Value |
| TXT | _cf-custom-hostname.example.com | 300 | (token from the modal) |
Leave the root A-record pointing at your origin IP. Do not add the Cloudflare edge records yet. Do not delete anything.
Wait out the TTL (typically 300 seconds), then confirm that Cloudflare’s own resolver can see both values — this is what it validates against, not your authoritative server:
dig @1.1.1.1 +short _cf-custom-hostname.example.com TXT # must return the token
dig @1.1.1.1 +short example.com A # must return your ORIGIN IP
Then click Refresh on the domain row in xCloud. The status should flip to Active. If 1.1.1.1 still shows old values, wait longer rather than changing anything.
Phase 2: Once the status is Active, point the root domain at the edge. #
| Action | Type | Name | Value |
| Delete | A | example.com | (your origin IP) |
| Add | ALIAS | example.com | edge.xcloud.app |
Keep the TXT record in place. A plain CNAME is not permitted at a zone apex, so use whatever flattened record your provider offers — ALIAS in Google Cloud DNS, ANAME or ALIAS elsewhere. If your provider has no equivalent, use the fallback A-records from the DNS instructions modal instead.
The certificate is issued shortly after and SSL goes Active.
If you get a Cloudflare Origin Certificate back, you reached the origin directly. That is almost always a stale local DNS cache, not a real failure.
Method: Setup Cloudflare Integrated Domain #
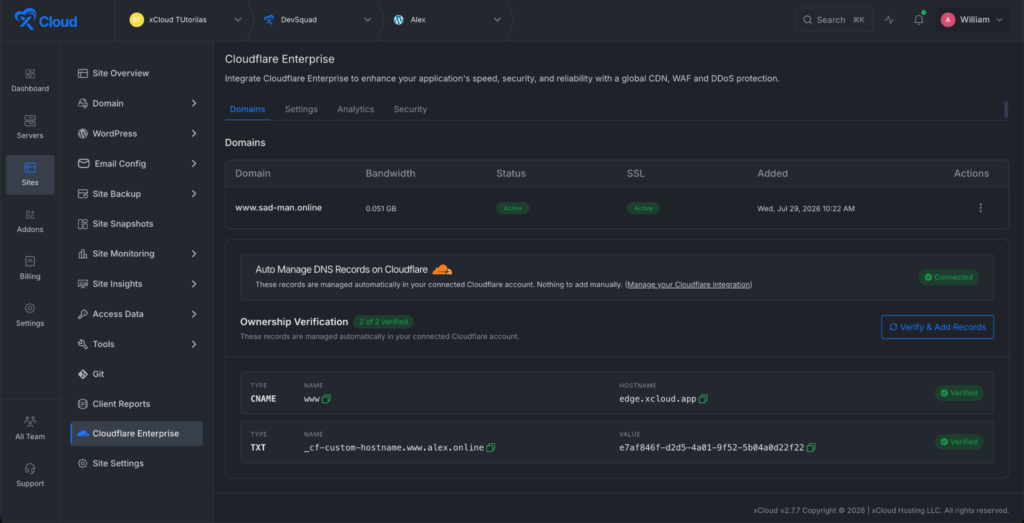
If your domain is Cloudflare-integrated, it will start connecting the DNS records automatically. Once it is connected, you will see that the domain status is “Connected” in your dashboard.
Method: Setup Your DNS with other DNS provider (Except Cloudflare Integrated) #
Step 1: Choose a Domain Not Integrated with Cloudflare #
If you have a domain that is not integrated with Cloudflare but is with another domain provider, choose that domain from the popup and click the pay button to proceed and complete the payment process.
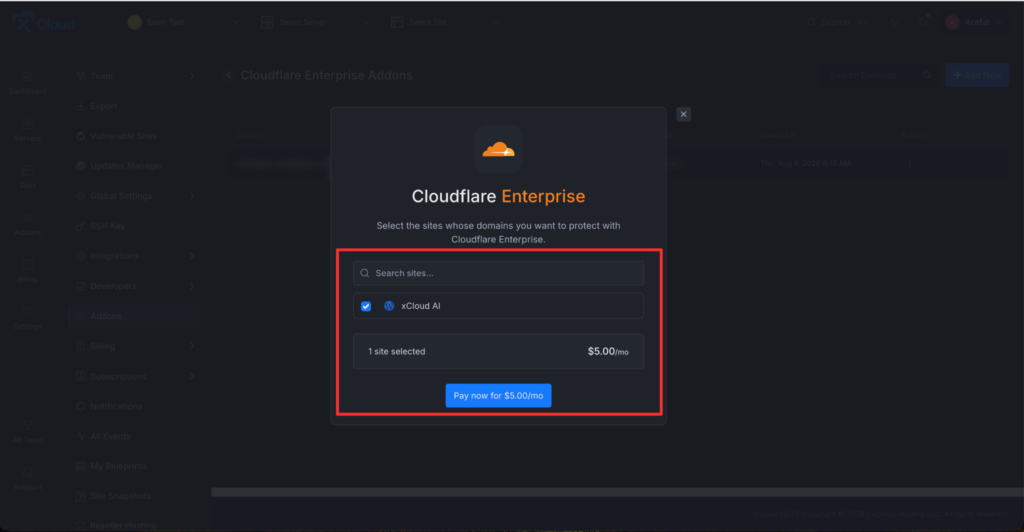
Next, you will see the domain added in the dashboard. Just click on the three-dot icon from your dashboard and then click on the “Manage” button.
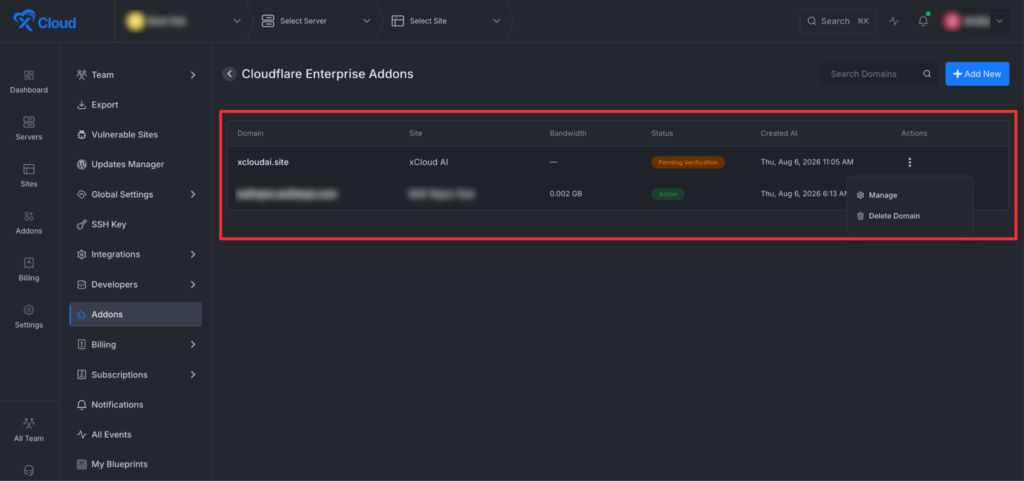
This will take you to the site’s dashboard. Here, you will get the DNS records for verification of the domain.
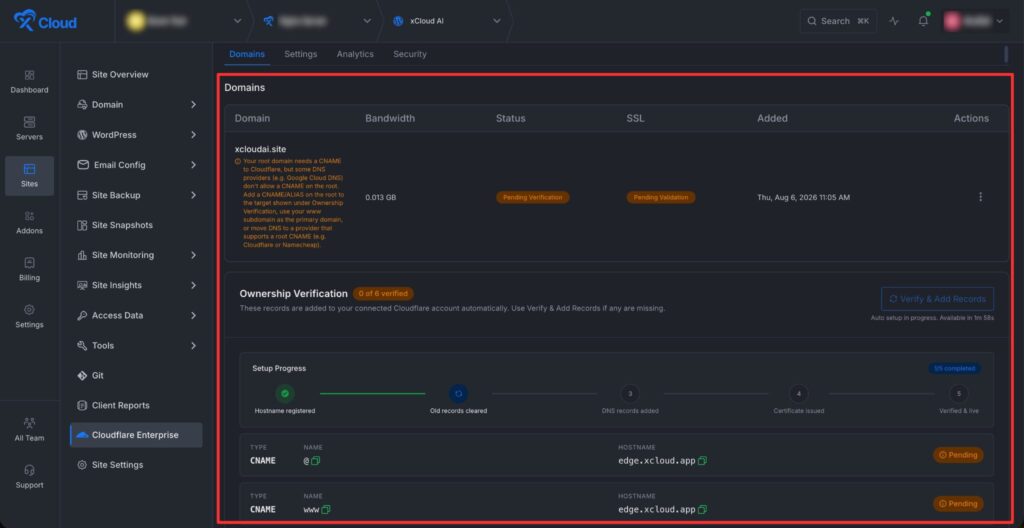
Ownership Verification #
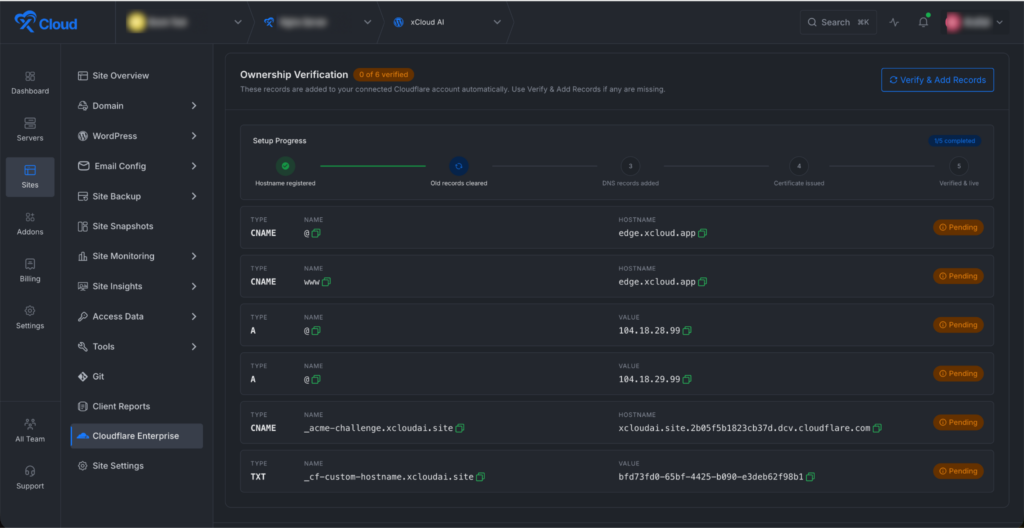
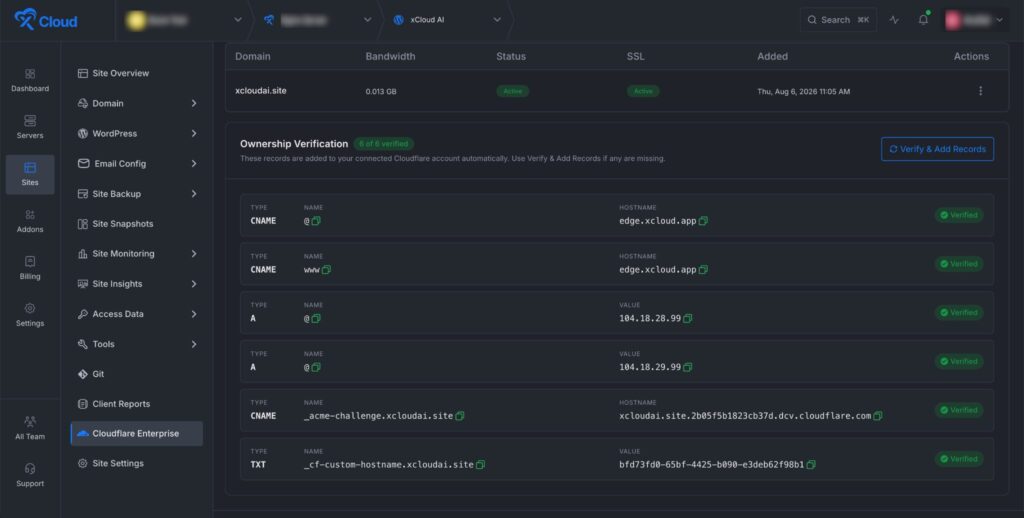
Go to the “Ownership Verification” section. You will find 6 records, including CNAME, A, and TXT records. Copy these one by one so that you can enter them into your domain provider’s settings.
You will get records like the below:
| Type | Name | Target / Value | Status |
| CNAME | @ | edge.xcloud.app | Pending |
| CNAME | www | edge.xcloud.app | Pending |
| A | @ | 104.18.28.99 | Pending |
| A | @ | 104.18.29.99 | Pending |
| CNAME | _acme-challenge.xcloudai.site | xcloudai.site.2b05f5b1823cb37d.dcv.cloudflare.com | Pending |
| TXT | _cf-custom-hostname.xcloudai.site | bfd73fd0-65bf-4425-b090-e3deb62f98b1 | Pending |
Step 2: Go to the Domain Provider #
Here we are setting up the Namecheap domain. Go to the ‘Domain List’, and enter your domain.
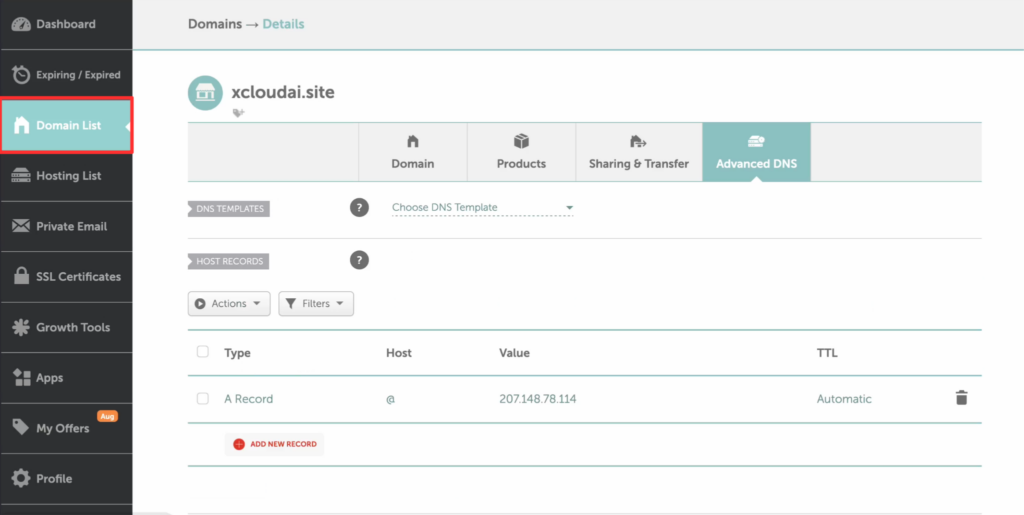
First remove the existing A record of your domain. Just click on the delete button of the A record.
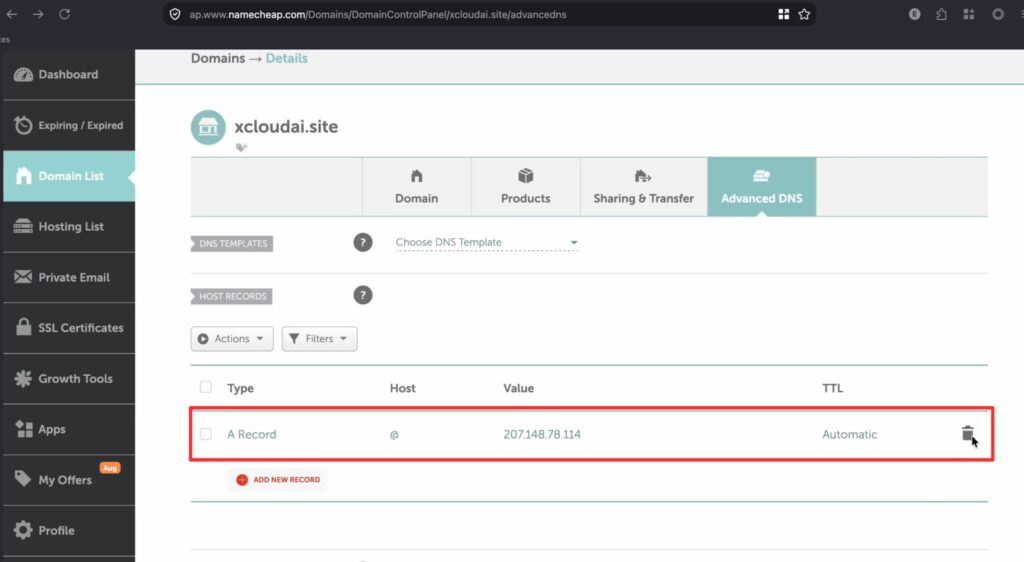
Afterwards, click on the ‘Add New Record’ and start adding each of the record one by one in your Domain provider’s dashboard that was showing in the xCloud dashboard.
Note: For the last two records (CNAME and TXT), you need to remove the domain name part at the end of the names. See the example below:
CNAME
| Type | Name | Target / Value | Status |
| CNAME | @ | edge.xcloud.app | Verified |
| CNAME | www | edge.xcloud.app | Verified |
| A | @ | 104.18.28.99 | Verified |
| A | @ | 104.18.29.99 | Verified |
| CNAME | _acme-challenge | xcloudai.site.2b05f5b1823cb37d.dcv.cloudflare.com | Verified |
| TXT | _cf-custom-hostname | bfd73fd0-65bf-4425-b090-e3deb62f98b1 | Verified |
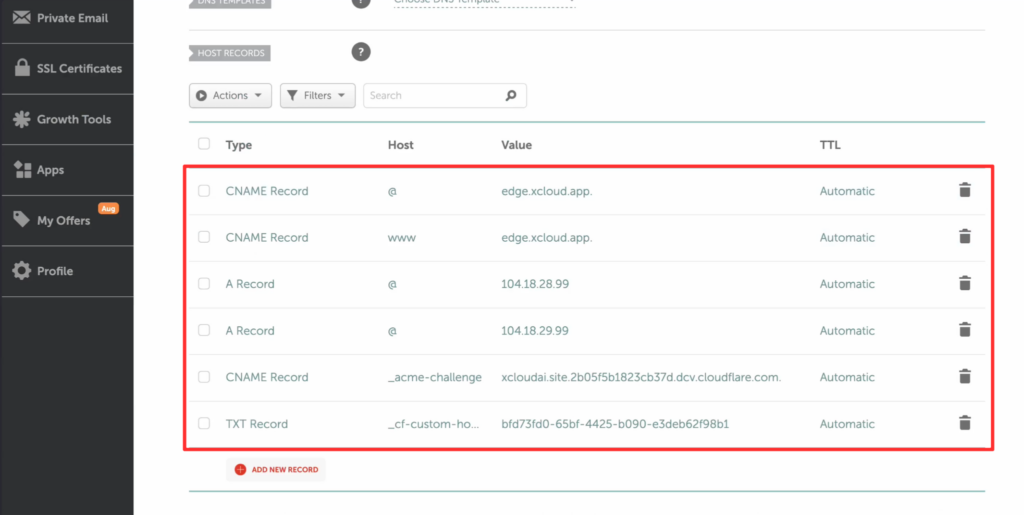
Once you complete adding the records, it will start automatically verifying them. You will need to wait for a few minutes. If the verification is not completed after a short wait, click on the “Verify & Add Records” button.
Step 4: Configure Cloudflare settings #
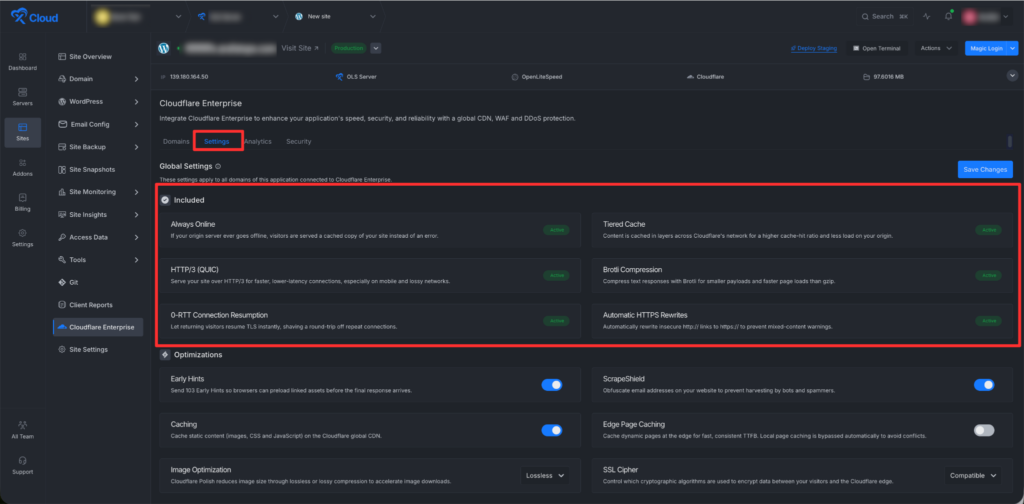
Next, open the Settings tab. Here you will get configuration settings for your site. These settings apply to all Cloudflare Enterprise domains on the current site.
Enabled by default #
The first block, Included, lists what you get automatically. These are switched on for every Cloudflare Enterprise domain and show as Active. There is nothing to configure and no toggle to set.
| Feature | What it does |
| Always Online | If your origin server ever goes offline, visitors are served a cached copy of your site instead of an error. |
| Tiered Cache | Content is cached in layers across Cloudflare’s network for a higher cache-hit ratio and less load on your origin. |
| HTTP/3 (QUIC) | Serves your site over HTTP/3 for faster, lower-latency connections, especially on mobile and lossy networks. |
| Brotli Compression | Compresses text responses with Brotli for smaller payloads and faster page loads than gzip. |
| 0-RTT Connection Resumption | Lets returning visitors resume TLS instantly, shaving a round-trip off repeat connections. |
| Automatic HTTPS Rewrites | Automatically rewrites insecure http:// links to https:// to prevent mixed-content warnings. |
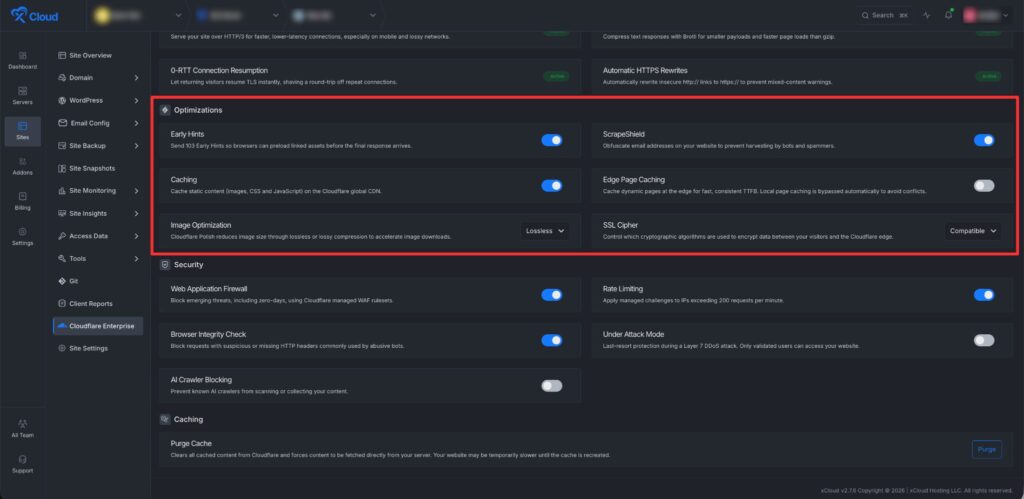
Configure Optimizations settings #
Optimization options:
| Setting | What it controls |
| Early Hints | Sends 103 Early Hints so browsers can preload linked assets before the final response arrives. |
| ScrapeShield | Obfuscates email addresses on the website to reduce harvesting by bots/spammers. |
| Caching | Caches static content such as images, CSS, and JavaScript on Cloudflare’s global CDN. |
| Edge Page Caching | Caches dynamic pages at the edge for faster TTFB; local page caching is bypassed automatically to avoid conflicts. |
| Image Optimization | Uses Cloudflare Polish-style image optimization. |
| SSL Cipher | Controls the SSL/TLS cipher profile used between visitors and the Cloudflare edge. |
Configure security settings #
Next, under the Security section below the optimization settings comes with many security options. These cover WAF and abuse-protection behavior for the site’s Cloudflare Enterprise domains.
Security options:
| Setting | What it controls |
| Web Application Firewall | Blocks emerging threats, including zero-days, using Cloudflare managed WAF rulesets. |
| Rate Limiting | Applies managed challenges to IPs exceeding the managed request threshold. |
| Browser Integrity Check | Blocks requests with suspicious or missing HTTP headers commonly used by abusive bots. |
| Under Attack Mode | Last-resort Layer 7 DDoS protection; visitors must pass additional validation before accessing the site. |
| AI Crawler Blocking | Blocks known AI crawlers from scanning or collecting site content. |
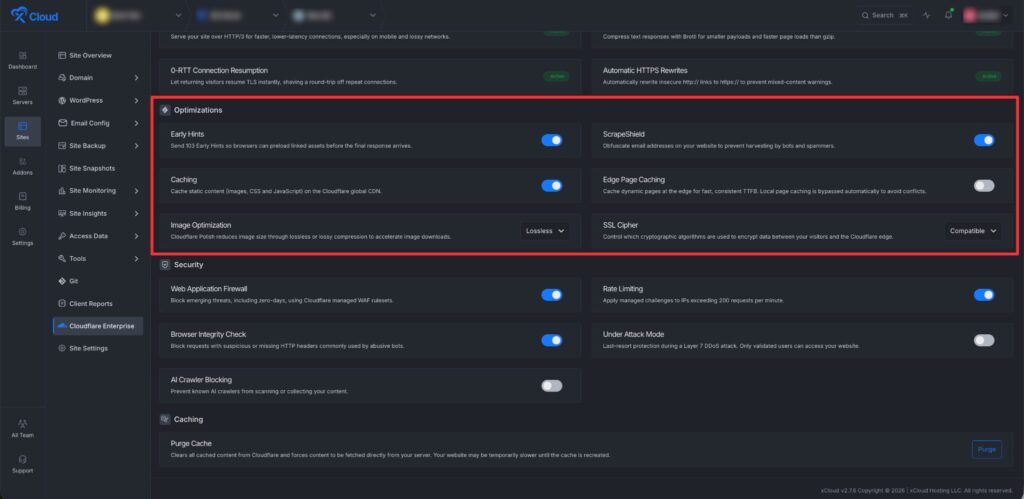
You can toggle on or off each of the options according to your preferences. Click Save Changes after changing any toggle or select. xCloud persists the settings for the site.
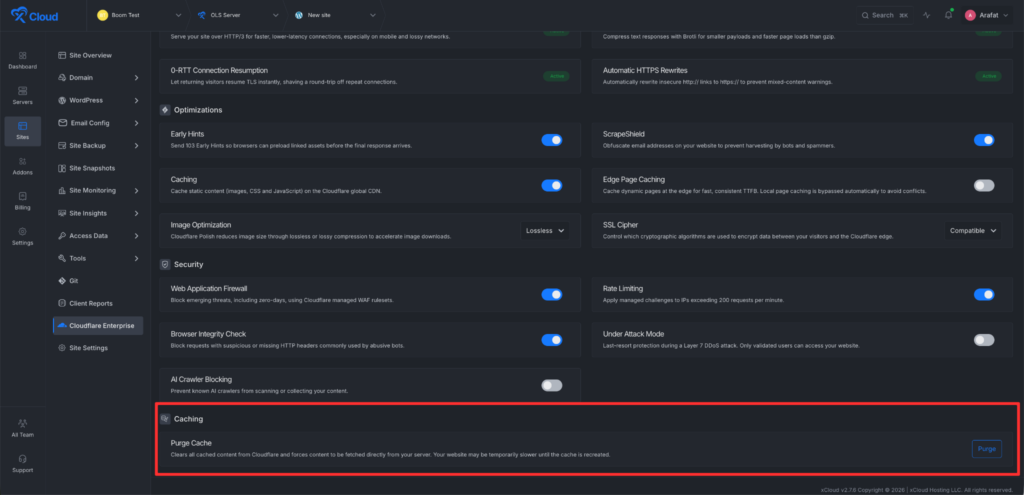
Caching #
Then to the Purge Cache section. This clears all cached content from Cloudflare and forces content to be fetched directly from your server, right from your xCloud dashboard.
Step 5: Configure optimization settings #
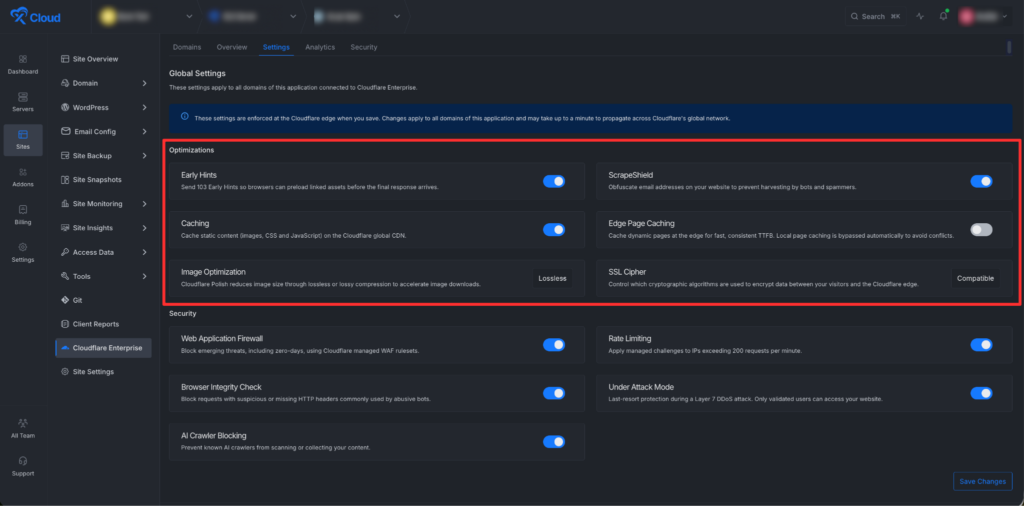
Open the Settings tab. These settings apply to all Cloudflare Enterprise domains on the current site.
| Setting | What it controls |
| Early Hints | Sends 103 Early Hints so browsers can preload linked assets before the final response arrives. |
| ScrapeShield | Obfuscates email addresses on the website to reduce harvesting by bots and spammers. |
| Caching | Caches static content such as images, CSS, and JavaScript on Cloudflare’s global CDN. |
| Edge Page Caching | Caches dynamic pages at the edge for faster TTFB; local page caching is bypassed automatically to avoid conflicts. |
| Image Optimization | Uses Cloudflare Polish-style image optimization. |
| SSL Cipher | Controls the SSL/TLS cipher profile used between visitors and the Cloudflare edge. |
Step 6: Configure security settings #
The Security section sits below the optimization settings. These cover WAF and abuse-protection behavior for the site’s Cloudflare Enterprise domains.
| Setting | What it controls |
| Web Application Firewall | Blocks emerging threats, including zero-days, using Cloudflare managed WAF rulesets. |
| Rate Limiting | Applies managed challenges to IPs exceeding the managed request threshold. |
| Browser Integrity Check | Blocks requests with suspicious or missing HTTP headers commonly used by abusive bots. |
| Under Attack Mode | Last-resort Layer 7 DDoS protection; visitors must pass additional validation before access. |
| AI Crawler Blocking | Blocks known AI crawlers from scanning or collecting site content. |
Toggle each option on or off as you prefer, then click Save Changes. xCloud persists the settings for the site.
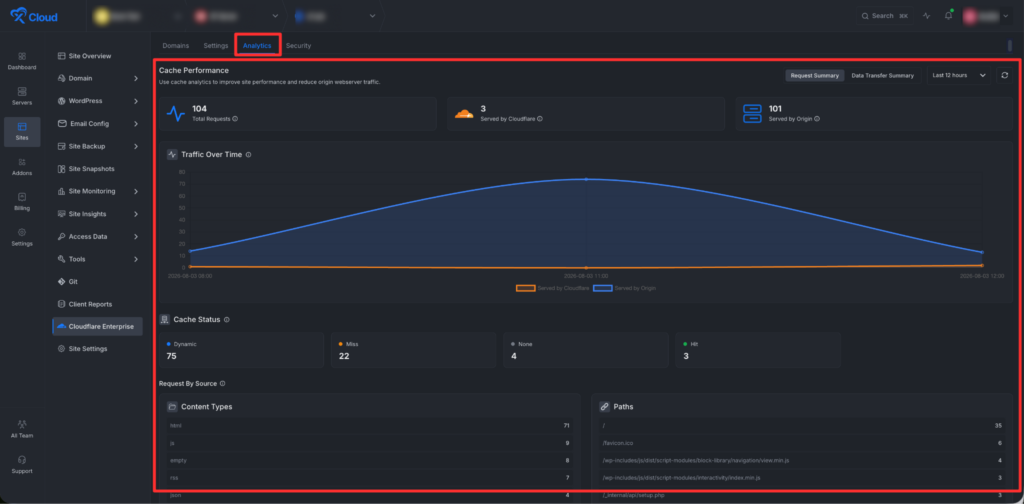
Step 7: Review Analytics – request summary #
Open Analytics. The default view is Request Summary, which includes:
- Range selector: Last 30 minutes, Last 6 hours, Last 12 hours, Last 24 hours, Last 7 days, and Last 30 days.
- Request summary cards: Total Requests, Served by Cloudflare, and Served by Origin.
- Time-series chart area.
- Cache status section.
- Top tables for request sources such as content types, paths, hosts, device types, countries, and edge status codes.
Step 8: Review Analytics — data transfer summary #
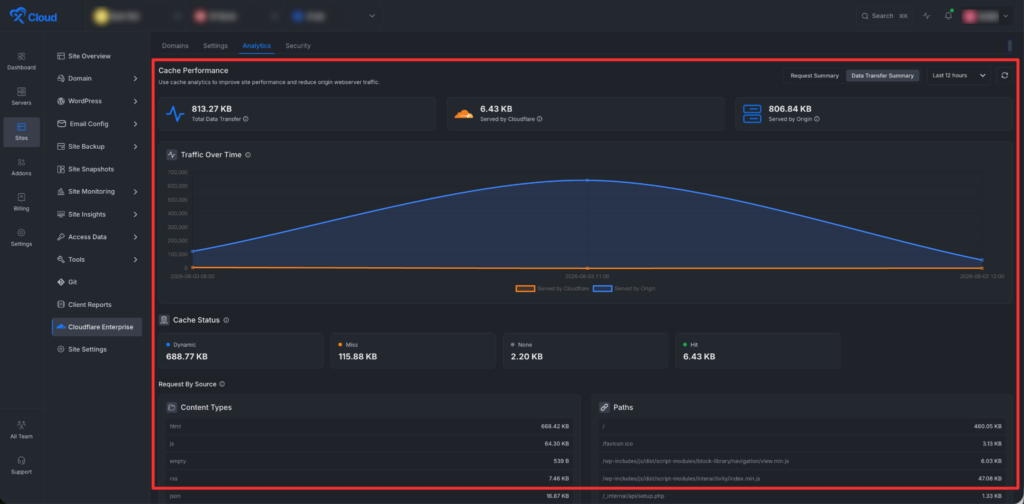
Use the toggle in the Analytics header to switch from Request Summary to Data Transfer Summary.
Step 9: Review security events #
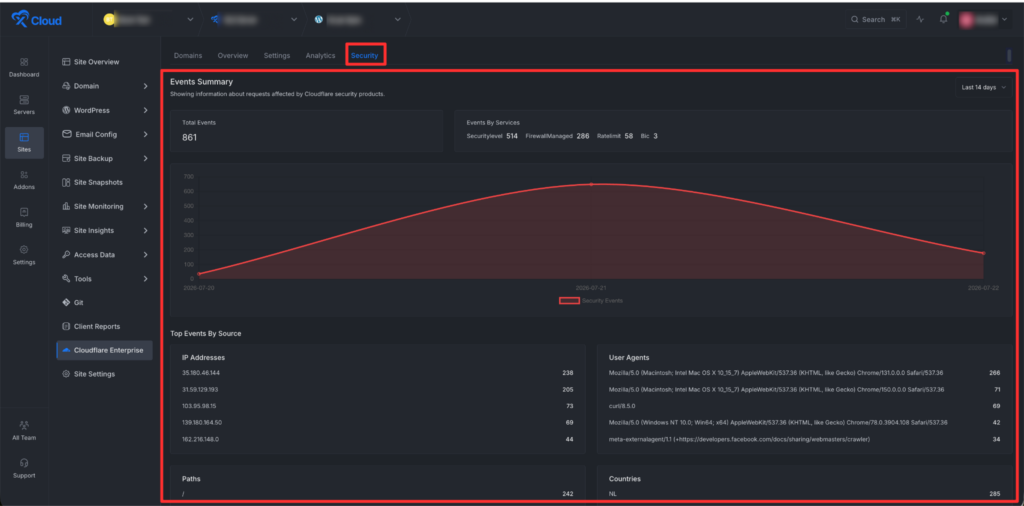
Open the Security tab for Cloudflare security-event reporting:
- Range selector using the same time windows as Analytics.
- Total Events card.
- Events By Services summary.
- Time-series security-event chart area.
- Top event tables: IP addresses, user agents, paths, countries, hosts, and HTTP methods.
Step 10: Manage all Cloudflare Enterprise domains from the global addon page #
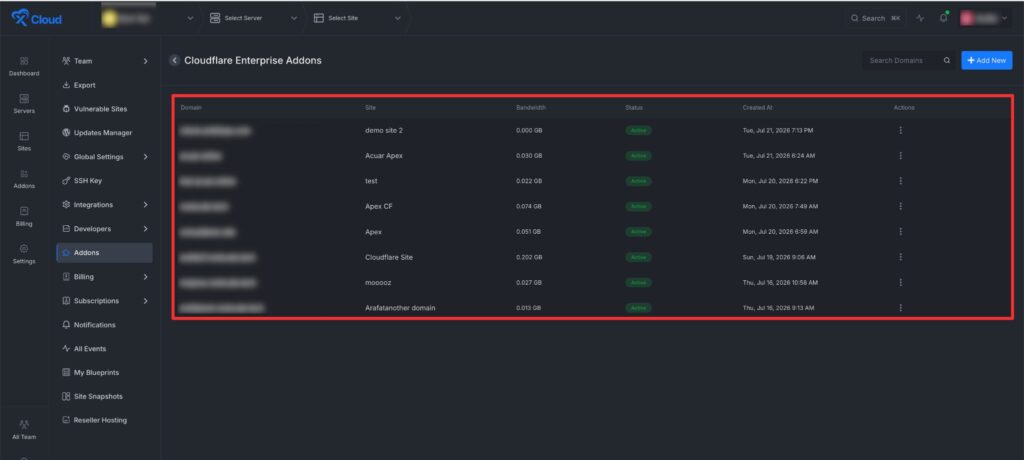
You can manage every domain from one place under the Addons page. Click the three-dot icon on any domain row to manage it, or remove a domain from the subscription.
Troubleshooting #
Stuck at Pending Verification with a “hostname is using Cloudflare” error #
Your root domain is already pointing at Cloudflare, so Cloudflare will not verify it. Break the deadlock like this:
- Temporarily repoint the root domain to your origin IP — delete the ALIAS or edge A-records, and add an A record pointing at the origin.
- Keep the _cf-custom-hostname TXT record exactly as it is.
- Wait until dig @1.1.1.1 +short example.com A returns the origin IP.
- Click Refresh in xCloud. The status goes Active.
- Point the root domain back to the edge (ALIAS → edge.xcloud.app).
Verification survives the DNS change. Once the hostname is active, it stays active.
Do not delete and re-add the domain in xCloud. Each cycle rotates the ownership token and forces you to update the TXT record again, with no benefit.
SSL stays at pending validation after the domain is Active #
xCloud’s nginx 301-redirects all HTTP traffic, so Cloudflare’s HTTP-based certificate challenge can receive a redirect page instead of the token. This usually resolves itself on retry.
The TXT record is not visible to Cloudflare #
If the domain was recently moved to a new DNS provider, the old provider’s nameservers may still be answering with stale records. Compare what resolvers see against what your authoritative nameserver returns:
dig +short example.com NS
dig @<authoritative nameserver> +short example.com A
Do not remove the edge records after activation #
Once the domain is Active, the ALIAS or edge A-records are what carry your traffic. They are only a problem before ownership is verified.
FAQ #
Do I need my own Cloudflare account? #
No. Your domain joins xCloud’s Cloudflare account as a custom hostname. Everything is managed from your xCloud dashboard, and you never log into Cloudflare.
Do I have to change my nameservers? #
No. Keep your domain at its current DNS provider. You only add the CNAME records xCloud shows you in the DNS instructions modal.
How much does it cost? #
$5 per month, per hostname. Each subscription covers a single domain. Subdomains are counted separately, if you want to use Cloudflare Enterprise for each domain
Is it per site, per server, or per domain? #
Per domain, and that includes subdomains. Every hostname you want behind Cloudflare Enterprise needs its own $5/month subscription, so example.com, www.example.com, and shop.example.com would each be a separate purchase.
Why does my domain say “Pending Verification”? #
It means the CNAME records aren’t visible yet at your DNS provider. Add the records shown under Domain → CNAME Records, then open the Domain Status tab and hit refresh. If your Cloudflare account is already integrated with xCloud, the domain activates instantly and you can skip this.
Will this conflict with xCloud’s page caching? #
No. When you turn on Edge Page Caching, xCloud automatically bypasses local page caching so the two layers don’t fight each other.
Do the settings apply to one domain or all of them? #
The Optimization and Security toggles apply to every Cloudflare Enterprise domain on the current site. Remember to click Save Changes after any toggle or dropdown change.
How do I clear the Cloudflare cache? #
Open the Cloudflare Enterprise section for the domain, go to the Overview tab, and use Purge Cache. It clears all cached content and forces the next request to fetch from your server.
Can I remove a domain later? #
Yes. On the Addons page, click the three-dot icon next to the domain and delete it from the subscription.
What happens if I delete the CNAME records? #
Traffic stops routing through Cloudflare’s edge and the domain drops out of verification. Add the records back and refresh the Domain Status tab to bring it live again.
How long does activation take? #
After DNS is pointed correctly, xCloud tries to activate the domain immediatly, if the Cloudflare account integrated with xCloud. But if you are using a domain with a different domain provider, you need to configure the DNS with your provider then refresh the status on xCloud.
Can a domain be removed? #
Yes. Use Remove from the domain row. xCloud warns that traffic may become unreachable if DNS is still pointed to Cloudflare Enterprise after removal.
Is the Cloudflare Enterprise addon refundable? #
No. Like all xCloud addons, the Cloudflare Enterprise addon is non-refundable once the subscription is activated. Addon purchases are final, so please review the domain, pricing, and billing details before you subscribe. You can read the full policy in the xCloud Refund Policy.
How much does the Cloudflare Enterprise addon cost? #
$5 per domain per month. You enable it per domain, so you only pay for the sites you want on it.
Does the price per domain include subdomains? #
One subscription covers the root domain and its www version. Other hostnames such as shop.example.com, app.example.com, or staging.example.com are separate subscriptions at $5 per hostname per month, so you enable only the ones you need.
Will the price change? How much notice will I get? #
We rarely change pricing, and our Cloudflare agreement is locked in long term, so our own costs are secured and there is no reason for the addon price to move. If anything, once we reach a certain volume our per-domain economics improve, and we intend to pass that on by lowering the price. If pricing ever did change, existing active subscriptions would get at least 30 days advance notice before anything takes effect.
Do I get access to the Cloudflare dashboard? #
No. Cloudflare Enterprise is managed through the xCloud dashboard. You won’t receive access to xCloud’s Enterprise Cloudflare account, but you can manage the available performance and security settings, analytics, security events, and cache purging directly from xCloud. If your own Cloudflare account is connected for DNS, you can still manage your DNS records there.
How does the setup work? #
Setup is hands-free from the xCloud dashboard. It’s smoothest when your domain is already in Cloudflare and that account is integrated with xCloud — enable the addon on the domain and the configuration is applied automatically.
What happens if something breaks in the Cloudflare integration? #
The Cloudflare configuration lives in our enterprise account, which means anything that breaks on that layer is ours to fix, not yours to debug. Our support team has full access to the Cloudflare side 24/7, so open a ticket and we handle it.
Can I purge the cache from my WordPress dashboard? #
You can purge the cache per site directly from the xCloud dashboard today. A plugin to purge from wp-admin is planned as part of a central xCloud plugin — the purge capability is already built, it just needs wiring into WordPress.
What’s the advantage over Cloudflare’s free plan? #
Cloudflare Free is a solid choice for basic CDN and protection. The Enterprise addon adds Cloudflare’s managed WAF, advanced DDoS protection, full-page edge caching, image optimization, Early Hints, Tiered Cache, configurable security controls, real-time traffic analytics, and security event reporting — all managed from xCloud without needing your own Enterprise contract or Cloudflare setup.
Can I add my own custom rules? #
Not yet. Because all domains run under our enterprise account, your rules from a personal Cloudflare account don’t carry over. Custom rules are the most requested feature from launch and are at the top of the roadmap for this addon. In the meantime, if there’s a specific rule you rely on, open a support ticket and we’ll see what we can configure on our side for your site.
Does Edge Page Caching interfere with wp-admin, logged-in users, or carts? #
No. Edge Page Caching automatically bypasses logged-in sessions, wp-admin, wp-login, the REST API, WooCommerce and EDD carts, checkout, my-account, feeds, sitemaps, and other dynamic requests. You can also add your own bypass paths per site in the Cache Bypass Paths setting — pages under those paths are never cached at the edge and always load fresh from your server.
How does Rate Limiting work? Can I change the threshold? #
Rate Limiting monitors requests per IP in 60-second intervals and applies a managed challenge above the threshold, which keeps bots, scrapers, and brute-force traffic off your server. The current default is 200 requests per minute — we’re monitoring how it performs across sites and tuning it. It’s not a hard Cloudflare cap: if the default doesn’t fit your site (for example a busy store), open a support ticket and we’ll customize the threshold for your domain. Self-serve customization is on the roadmap.
Is there still a 100-second timeout limit? #
No. On Enterprise the timeout is no longer fixed like on the free plan. We currently run it at 200 seconds and can raise it further per use case — Cloudflare allows up to 6,000 seconds. If you have a legitimate long-running process hitting 524 errors, open a support ticket.
Is Cloudflare R2 included? #
R2 is already supported in xCloud as an external storage provider for backups. It isn’t bundled into the Cloudflare Enterprise addon, but we’d love to hear what R2 integration you’d like to see.
What happens if Cloudflare has an outage? #
The addon can be disabled per domain at any time, and traffic routes straight back to the origin, your site keeps running on xCloud’s infrastructure without the Cloudflare layer.
Can I exclude specific pages from edge caching? #
Yes. Open the site’s Cloudflare Enterprise Settings and use Cache Bypass Paths. Add one path per line — for example /members or /private-area — and every page under those paths is never cached at the edge and always loads fresh from your server. You don’t need to add the common dynamic pages yourself: logged-in users, carts and checkout, wp-admin, wp-login, and my-account are always bypassed automatically. Click Save Changes after editing, and purge the cache if the pages were already cached before you added the path.
Is bandwidth really unlimited? #
Each domain subscription includes 100 GB of bandwidth per month, which covers the vast majority of WordPress sites — full-page edge caching means most requests are served from Cloudflare’s edge without touching your server. Usage beyond 100 GB is billed at $0.02/GB, prorated, so a high-traffic site pays transparently for what it uses instead of hitting a hard cap or a forced upgrade. You can monitor your data transfer anytime in the Analytics tab of the addon.
What SLA backs this? #
We’re on a signed enterprise agreement with Cloudflare with enterprise support behind it. The contract terms are confidential between Cloudflare and us, so we can’t publish specifics — but your recourse is with us, and our support commitment to you doesn’t change based on which layer caused an issue.
What about data privacy and MITM risks under xCloud’s enterprise plan? #
TLS terminates at Cloudflare’s edge exactly as it does on any Cloudflare plan, including the free plan you may already use — the enterprise setup doesn’t add a new attack vector. Connections from Cloudflare to our origin stay encrypted end to end, and each customer domain is isolated as its own custom hostname with its own certificate, so there’s no shared certificate or crossover between customers. We don’t inspect, log, or store your traffic content, and you’re covered by Cloudflare’s standard data processing terms like any Cloudflare customer.


